Start Your Book Printing Project
Share a few details about your book. JetPrint will review your specifications and help you identify the suitable printing, paper, binding, and finishing options for your project.
An Adobe InDesign document can look perfect on your screen and still arrive at a printing company fundamentally incomplete.
Files go missing.
That sounds trivial, yet in a 200-page book containing hundreds of photographs, multiple typefaces, Illustrator graphics, custom color swatches, and several rounds of revisions, one missing link can trigger substitutions, production delays, or an expensive proof that nobody expected.
Why take that risk?
When you package InDesign files, InDesign collects the source document and its dependent production assets into one organized folder. That folder can include linked graphics, permitted font files, updated links, an IDML copy, a PDF proof, and a report describing the document.
Adobe’s current InDesign packaging documentation, updated June 2, 2026, recommends running preflight before packaging and resolving missing fonts, missing links, and other reported problems before handing the project to a printer or collaborator.
I consider that the minimum professional standard. Sending a naked .indd file and assuming the printer can reconstruct everything is not efficiency. It is transferring avoidable detective work to the prepress department.
An InDesign document is an assembly file rather than a sealed container.
The .indd file records page geometry, styles, text, colors, object positions, and references to placed assets. It may display a photograph inside the layout, but that does not necessarily mean the full-resolution photograph is stored inside the INDD file. InDesign usually points to the original external image through a file path.
Packaging changes the handoff.
The File > Package command creates a new folder and collects the components needed to open, inspect, edit, and output the project. Depending on the selected options and font permissions, that folder can contain:
.indd documentLinks folder containing placed graphicsDocument Fonts folder containing eligible local fonts.idml interchange copyThis is why anyone searching “what does packaging an InDesign file do” should understand one hard distinction: packaging does not automatically make weak artwork print-ready. It only collects the available components.
A 72 ppi web image remains a 72 ppi web image after packaging. An RGB object remains RGB. Overset text remains hidden. A missing link remains missing unless you repair it first.
The package is a transport system, not a repair service.
A print-ready PDF is often the preferred production file because its fonts, images, and layout can be embedded into a comparatively stable output format. But there are situations where a printer may also request the editable InDesign package.
The printer may need to:
For a straightforward project, start by asking whether the supplier wants a PDF, an InDesign package, or both. The requirements can differ between digital printing, offset printing, hardcover production, paperback production, and specialty finishing.
JetPrint’s overview of custom book printing options provides useful context for projects where page count, binding format, cover construction, paper, and finishing choices can affect file preparation.
And this matters more than many designers admit. A cover file for a casebound book is not merely the paperback cover exported again. The final case dimensions, board thickness, hinge areas, wrap allowance, and spine width can change the required template.
The safest sequence is not “package first, inspect later.” It is:
Save the current document before doing anything else.
Then create a clearly named final production version rather than packaging a working file called Book_Final_Final2_NEW.indd.
A practical naming structure is:
ProjectName_TrimSize_Language_Version_Date.indd
For example:
WildlifeAtlas_210x285mm_EN_v12_2026-07-31.indd
I prefer dates in YYYY-MM-DD format because they sort correctly in folders and remove arguments about whether 07-08-26 means July 8 or August 7.
Do not overwrite the only editable copy. Keep an archived working version before making last-minute production corrections.
Go to:
Window > Output > Preflight
The Preflight panel continuously checks the document against the active preflight profile. Adobe says it can report problems by categories such as Links, Text, and Color and can take the user directly to the affected page or object.
The default profile is useful, but it is not enough for every commercial printing job. A custom profile may also need to check:
Here is the uncomfortable truth: a green preflight indicator only means the document passed the selected profile. It does not mean the profile checked everything the printer cares about.
Open:
Window > Links
Look for warning symbols beside image names. A missing link means InDesign cannot locate the original asset. A modified link means the source image changed after it was placed and the InDesign preview is no longer synchronized with the current file.
Relink missing assets and update modified ones before packaging.
Do not accept a low-resolution preview simply because it looks adequate at 100% zoom. Commercial output uses the underlying linked asset, not your optimism.
Adobe’s Links panel guidance specifically recommends verifying that all links are current and available before packaging files for output.
For many conventional book-printing projects, continuous-tone images are commonly prepared near 300 ppi at final placed size, while line art may require substantially higher resolution. But the correct threshold depends on the printing process, screening, substrate, image type, and supplier specification.
The words “at final placed size” matter.
A 300 ppi image scaled to 200% in InDesign has an effective resolution of approximately 150 ppi. The original resolution has not changed, but the same pixels are now covering twice the width and twice the height.
Check the Effective PPI field in the Links panel rather than relying only on Actual PPI.
For project-specific requirements, review the printer’s book printing and production capabilities before locking the artwork.
Open:
Type > Find/Replace Font
Confirm that every required font and weight is available. Check regular, italic, semibold, bold, condensed, variable, and language-specific styles separately.
A font family being installed does not guarantee that the exact style used in the document is available.
Missing fonts can cause:
Adobe notes that InDesign can highlight substituted text in pink, while Adobe Fonts can sometimes be auto-activated when the user is signed in and the required typeface remains available in the service.
But do not assume the printer uses your account, your subscription, or your version of the font.
Confirm the final page size under:
File > Document Setup
Then check whether the project contains the bleed requested by the printer. Common requirements include 3 mm in metric workflows or 0.125 inch, equal to 3.175 mm, in some North American workflows. Those figures are common conventions, not universal laws.
Weber State University’s print guidance, for example, specifies a 0.125-inch bleed for its workflow and tells users to repair broken links and missing fonts before packaging. Your own printer may request something different.
Extend photographs, colors, and other edge-to-edge artwork completely through the bleed. Merely entering 3 mm in Document Setup does not extend the artwork itself.
Keep page numbers, body text, logos, borders, and other sensitive content inside the printer’s recommended safe area. A narrow border placed close to the trim can expose even small cutting variation.
Open:
Window > Output > Separations Preview
Check which process and spot-color plates are being generated.
A standard four-color book may require only:
But a specialty project could intentionally use Pantone inks, metallic ink, fluorescent ink, varnish, white ink, or another separately defined plate.
The problem is not that spot colors exist. The problem is unintended duplicates such as:
PANTONE 186 CPantone 186 CPANTONE 186 URed SpotThose names can create separate plates unless the swatches are consolidated or mapped correctly.
The printer should make that decision with you. Do not silently convert an intentional brand color to CMYK, and do not leave five accidental spot plates in a four-color book.
Before creating the package, export a reference PDF showing exactly how the finished document is expected to look.
Go to:
File > Export > Adobe PDF (Print)
Use the printer’s requested preset or PDF standard. PDF/X-4 is often used in modern color-managed workflows because it can retain live transparency and ICC-based color information, while some established workflows still request PDF/X-1a or another standard.
Adobe’s official PDF export instructions allow the user to choose an Adobe PDF preset or a PDF/X standard in the export dialog. The printer’s specification should override generic online recommendations.
Check the exported PDF page by page. Do not assume a successful export proves the content is correct.
Inspect:
For a complete discussion of final output files, see the guide to preparing files for custom book printing.
Now select:
File > Package
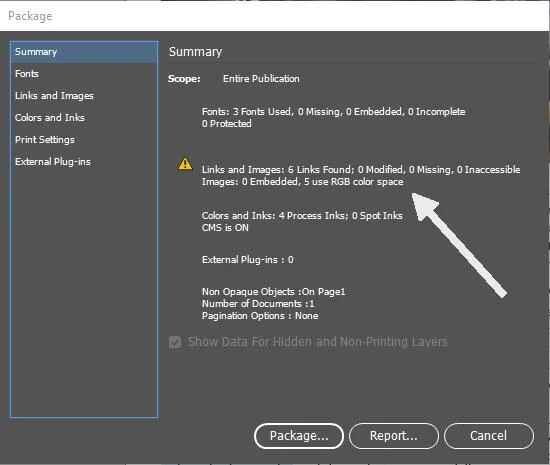
InDesign will display a package summary covering fonts, links, colors, inks, and print settings. Review every warning.
Do not click through red alerts just because a deadline is approaching.
Indiana University’s training example shows why preflight must come first: its sample publication reported five errors—three link errors and two text errors, including overset text and a missing font—before it was considered ready for packaging. That is a controlled teaching example, but it mirrors the exact categories that cause real handoff failures.
Click Package only after the relevant problems have been resolved.
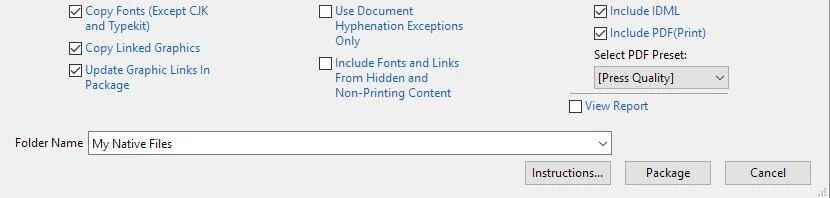
The available options can vary by InDesign version, but a print handoff commonly includes:
Iowa State University Printing Services specifically instructs users to resolve missing links or fonts and select Copy Fonts, Copy Linked Graphics, Update Graphic Links, Include IDML, and Include PDF for its package workflow. That is a real production department telling users exactly what it expects, not a generic design-blog checklist.
After packaging, open the new folder manually. Never assume that clicking Package ended the job.
| Package component | Purpose | What to verify |
|---|---|---|
| INDD file | Native editable layout | Opens without missing-link or font warnings |
| Links folder | Collects placed images and graphics | Files are present, current, and not merely low-resolution proxies |
| Document Fonts folder | Contains eligible local fonts | Font licenses permit transfer; required styles are included |
| IDML file | Provides interchange and recovery options | File opens and produces the expected layout |
| PDF proof | Shows intended visual output | Correct pages, bleed, dimensions, colors, and cover orientation |
| Report or instructions | Communicates document and job information | Project name, version, contact details, and special production notes are accurate |
| Readme file | Records handoff instructions | Identifies approved PDF, software version, and unresolved exceptions |
Open the packaged INDD file from inside the new folder—not the original file elsewhere on your computer.
Then open the Links panel and confirm that its paths point into the packaged Links folder. If the packaged file is still referencing images in your desktop, Downloads folder, cloud cache, or external drive, the handoff is not truly self-contained.
Here is where many packaging tutorials become dangerously casual.
The ability to click Copy Fonts does not automatically grant the legal right to distribute every copied font file.
Adobe’s font-packaging guidance states that many font licenses do not allow font files to be sent to third parties unless the recipient has its own valid license. Adobe also says fonts activated through Adobe Fonts cannot simply be copied or moved into a package for distribution.
That leaves several legitimate options:
Outlining every paragraph is usually a bad solution. It destroys editability, can increase file complexity, removes font hinting, complicates accessibility, and makes late corrections painful.
For body text, embedded fonts in a verified PDF are generally more controlled than converting an entire book to outlines.
These formats solve different problems.
| Format | Best use | Main advantage | Main limitation |
|---|---|---|---|
| INDD | Native editing in a compatible InDesign version | Preserves the full source layout | Version-specific and dependent on links and fonts |
| IDML | Compatibility, interchange, and document recovery | Can help older versions open the project | Newer features may change or be omitted |
| PDF/X | Final printing and controlled output | Embeds the visual result into a stable file | Not intended for full native editing |
| Packaged ZIP | Transfer of source layout and dependencies | Keeps the editable project together | Must still be checked for errors and licensing restrictions |
Native INDD files are version-specific. Adobe explains that a file created in a newer InDesign version may not open directly in an older release, while IDML can provide a compatibility route; Adobe also warns that features introduced in the newer version may be modified or omitted when the IDML file is opened in an earlier version.
So should you export an InDesign package with IDML?
Usually, yes.
Including IDML costs little, provides another recovery route, and helps when the designer and printer are not using the same InDesign release. But the PDF proof remains the visual benchmark. If the IDML version reflows text or changes an unsupported feature, the printer needs a reliable reference showing the intended result.
Many printers would rather receive a properly prepared PDF than edit your native document.
Send a print-ready PDF when:
Send the packaged source as well when:
A PDF and a package are not competitors. One is the controlled output; the other is the editable production source.
For projects involving binding, finishing, paper selection, and complex cover construction, review the supplier’s printing capabilities and prepress support before deciding which files to submit.
Do not upload hundreds of loose files one at a time.
Compress the entire package folder into one ZIP archive so the internal folder structure remains intact.
A useful archive name is:
ProjectName_PrintPackage_v12_2026-07-31.zip
Before uploading it:
Include a short README.txt containing:
And be direct. “All files attached” tells the prepress operator almost nothing.
The document arrives without its external images or usable fonts. The printer opens it and immediately sees missing links.
This is the classic failure.
The package contains the same unresolved problems as the original project. Packaging did not repair anything.
The printer uses a different InDesign version and cannot open the native document without conversion.
Adobe Fonts activated through Creative Cloud are not distributed as ordinary font files in the package. The recipient may need to activate the same typeface independently.
The package contains an old proof while the email refers to a newer version. Nobody knows which file is approved.
Use one clearly named production PDF.
A photograph downloaded from a website may be 72 or 96 ppi and heavily compressed. Packaging faithfully collects the inadequate file.
Hidden text may include entire paragraphs, footnotes, table rows, index entries, or legal wording. The PDF may export without displaying that missing content.
A bleed value in Document Setup does not help unless the edge artwork physically extends into that area.
Changing filenames inside the Links folder can break the paths in the packaged document. Make naming corrections before the final package or relink everything afterward.
Cloud-transfer tools can alter structures, omit files, or create confusing duplicate folders. A single ZIP archive is easier to verify and archive.
Before you send InDesign files to a printer, confirm all of the following:
A printer can still find a production issue after all those checks. That is what professional prepress is for.
But the discussion will be about genuine production decisions—not hunting for photo-final-3.tif on someone else’s laptop.
Packaging an InDesign file means using File > Package to collect the editable INDD document, linked graphics, permitted local font files, updated links, an optional IDML file, an optional PDF proof, and a production report into one organized folder that another designer or printer can open reliably.
It does not automatically correct low-resolution images, overset text, color errors, missing links, or incorrect bleed.
You should send a packaged InDesign file when the printer must inspect, correct, relink, translate, resize, or otherwise edit the source layout; when no editing is expected, a printer-approved PDF/X file is usually safer because it preserves the intended appearance and reduces dependency problems.
Many book-printing projects benefit from sending both the approved PDF and a packaged source archive.
An InDesign package normally includes the INDD source file, a Links folder, a Document Fonts folder containing only fonts that may legally be copied, a text report, and—when selected during packaging—an IDML interchange file plus a PDF proof showing the intended final layout.
Open each component before uploading the final ZIP archive.
IDML is not mandatory for every print job, but including it is a sensible compatibility safeguard because native INDD files are version-specific, while an IDML copy can often be opened by an earlier InDesign version or used to rebuild a document whose internal structure has become unstable.
The PDF proof should still be used to detect any layout changes after conversion.
Adobe Fonts are not copied into an InDesign package because Adobe’s terms do not allow users to move or distribute those font files; the printer must activate the same fonts through its own Creative Cloud access, hold another valid license, or work from a PDF with fonts properly embedded.
Always tell the printer which Adobe Fonts the project uses.
Zipping an InDesign package means compressing the entire package folder—not selecting isolated INDD, Links, and font files separately—so the folder structure, relinked asset paths, IDML copy, proof PDF, and report remain together during upload, cloud transfer, email delivery, or production archiving.
After creating the ZIP file, check that it can be opened and that its contents match the original package folder.
A properly packaged InDesign project tells the printer that the designer understands production, not merely page layout.
Run preflight. Repair the links. Check the fonts. Inspect the colors. Export the approved PDF. Include the IDML file. Open the packaged document. Then zip the complete folder and identify the final production file in writing.
Do not make the printer guess.
For help reviewing book specifications, cover requirements, binding choices, or production files, contact JetPrint’s book-printing team before submitting the final artwork. A short prepress discussion before production is far cheaper than discovering a preventable file problem after proofing or printing has begun.

Leave Your Comments